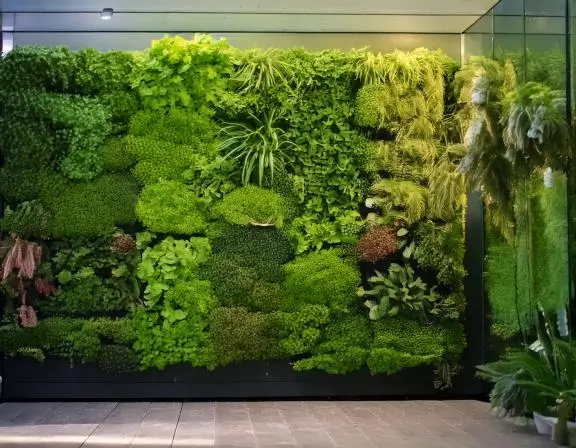
Vertical gardening, or green wall gardening, is a creative and space-efficient way to grow plants. Whether you want to enhance your home’s aesthetic, create a small urban oasis, or maximize limited space, vertical gardens offer a stunning solution. This comprehensive guide will walk you through the essential steps of designing and installing a green wall, from planning to maintenance.
Step 1: Planning Your Vertical Garden
Carefully planning your vertical garden is crucial before diving into the design and installation. Consider the following factors:
- Location: Determine where you want to install your green wall. Indoor vertical gardens work well in living rooms, kitchens, or offices, while outdoor walls can enhance patios, balconies, or garden spaces. Assess the light conditions in the chosen location, as this will influence plant selection.
- Size and Scale: Measure the wall or space you plan to use. Decide how large you want your green wall to be, considering the height and width. Ensure the wall can support the weight of the plants and the structure.
- Plant Selection: Choose plants suited to your location’s light conditions and climate. For indoor gardens, low-light-tolerant plants like Pothos or Spider Plant are excellent choices. Outdoors, consider sun-loving plants like Sedum, Ivy, or Herbs. Think about the plant growth patterns and mix different textures and colors for visual interest.
Step 2: Designing Your Green Wall
Designing your green wall involves creating a layout that maximizes plant health and aesthetic appeal. Here’s how to approach the design process:
- Choose a Structure: You can use various structures for your vertical garden. Some popular options include wall-mounted planters, trellises, and modular panels. Consider using pre-made vertical garden kits or building a custom frame from wood, metal, or PVC.
- Create a Layout: Sketch a layout of your green wall. Plan the arrangement of plants, ensuring that taller plants are placed at the bottom and shorter ones at the top. This layout helps in achieving a layered effect and allows for even growth.
- Consider Irrigation: Plan an irrigation system to ensure your plants receive consistent water. Options include drip irrigation systems, which can be installed along the vertical garden, or self-watering planters. Rainwater harvesting or a simple watering can might be sufficient for outdoor gardens.
Step 3: Installing Your Vertical Garden
With your design in place, it’s time to install your green wall. Follow these steps for a successful installation:
- Prepare the Wall: Clean and prepare the wall where you’ll install the green garden. Ensure it’s free of dust, dirt, or any peeling paint. If you’re using a wooden structure, treat it with a weather-resistant sealant.
- Install the Structure: Mount the vertical garden frame or structure onto the wall. Use appropriate anchors and screws to secure it firmly. If using a pre-made kit, follow the manufacturer’s instructions for installation.
- Attach Planters: If you use modular panels or wall-mounted planters, attach them to the structure according to your design. Make sure they are securely fastened and aligned with your layout.
- Add the Soil and Plants: Fill the planters with a well-draining soil mix. Plant your chosen varieties according to the design layout. Gently press the soil around the roots to secure the plants.
Step 4: Maintaining Your Green Wall
Maintaining a vertical garden is essential to keep it lush and healthy. Here are key maintenance tips:
- Watering: Regularly check the soil’s moisture levels. Indoor green walls may require more frequent watering than outdoor ones. Water the plants when the soil feels dry to the touch, but avoid overwatering, which can lead to root rot.
- Fertilizing: Feed your plants with a balanced, water-soluble fertilizer every 4-6 weeks during the growing season. Follow the manufacturer’s instructions for application rates and frequency.
- Pruning and Trimming: Regularly prune and trim your plants to prevent overgrowth and maintain the desired shape. Eliminate any dead or yellowing leaves to encourage healthy growth.
- Pest Control: Watch for pests like aphids, spider mites, or mealybugs. Manage infestations using organic solutions such as neem oil or insecticidal soap. Ensure proper air circulation around the plants to minimize pest issues.
- Cleaning: Clean the green wall structure and surrounding area to prevent the buildup of dust and debris. If necessary, remove and clean individual planters or panels.
Step 5: Troubleshooting Common Issues
You may encounter some common issues with vertical gardens, even with proper care. Here’s how to address them:
- Yellowing Leaves: Yellowing leaves can indicate overwatering or poor drainage. Check the soil moisture and adjust your watering routine. Ensure that the planters have adequate drainage.
- Wilting Plants: Wilting can result from underwatering or insufficient light. Check the soil moisture and ensure your plants get the right light. Adjust the watering schedule or relocate the green wall if needed.
- Pest Infestations: If you notice pests, act quickly to address the problem. Use organic pest control methods and keep the plants well-maintained to reduce the risk of infestations.
Conclusion
Designing and installing a vertical garden can transform any space, adding beauty and greenery to both indoor and outdoor environments. By carefully planning, designing, and maintaining your green wall, you can create a thriving vertical garden that enhances your living space and brings the benefits of nature right to your wall. Embrace the art of vertical gardening and enjoy its aesthetic and environmental benefits.

